One of the most exciting yet challenging projects in Adobe Photoshop is enhancing photos of a face by using:
Photoshop Face Effects
It sounds like I’m talking about pre-programmed filters. Please let me be clear, that this is most definitely not the case. The best effects are the ones done on a case by case basis where you analyze what the photo actually requires rather than running some sort of prefabricated Photoshop action or filter. It’s takes quite a bit of experience to be able to make those calls, but once you can, the possibilities of enhancing photographs are endless.
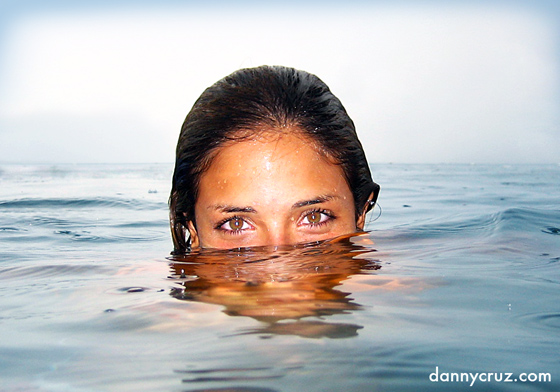
This photo is of a friend of mine (I’m not going to reveal who she is). I’m actually not sure who shot it. The thing to notice is that when you start off with a beautiful face, specially that of a girl, it is much easier and exciting. With this kind of photo, getting great results is relatively easy. However, once thing I have to point out is: This photo was shot during a rainy day, with so-so lighting and a cheap digital camera. Yes! My challenge was to improve the quality of the photo so that it would rival those shot with a professional camera. Apart from that, I had to improve the light, color tones of the image and add sharpening.
These are some of the things I did to enhance the photograph:
- Changed the water and sky color tone from a pale gray to a more inviting blue while still maintaining the mood of an overcast rainy day.
- Removed some buildings in the background that were to the left of the model’s head. This was done in order to better balance the photo and to give the impression that she was in deeper waters. I also found the buildings to be a distraction; an eye-sore, if you will.
- Removed a reflection of her eyes in the water in front of her. There was a reflection of one of her eyes in the center, more or less where her mouth would be. I thought it looked a bit weird, almost like a 3rd eye, but below.
- Cleaned some of the specks on the water and her face while brightening up her eyes. I also added a level of sharpening to her face.
- Finally, I added a faint grayish-blue vignette around the edges of the photo to help draw the attention to the center. The tone of the vignette also fits perfectly with the color tone of the photograph.
Like I said earlier, the possibilities and options for Photoshop face effects are endless. You can do as much as you know how. That’s why it’s so important to get as familiar as you can with all aspects of Photoshop. One very common technique, which can be done in multiple ways is changing a color photo to black and white. Here is a great tutorial that explains the most popular techniques: How to Change a Photo to Black and White in Photoshop.
To find out more of what I can do to improve your photos for your website or printed publication, don’t hesitate to click here to contact me.
I wonder if the reason people like this post so much is because of the tips or the girl? https://bit.ly/kTViOX
I wonder if the reason people like this post so much is because of the tips or the girl? https://bit.ly/kTViOX RT @sixstringsensei